All seam allowances are 1/2" unless otherwise noted.
You can use a shirt you already own or you can make one. I didn't have a suitable top so I made one.
 Cut up the men's shirts into the largest pieces possible. I used Simplicity 3887 view C/F for the top. I have made this top two other times and have had success with it. Lay out your pattern pieces, pin and cut. Assemble the shirt according to the patterns directions.
 I made two modifications to the pattern 1- I didn't use the full length of the pattern since it would have just been cut off later. 2- Instead of an elastic casing on the arm, I gathered the bottom of the sleeve and finished it with bias tape. Same basic look, just a little more finished looking.
 Figure out where your natural waist is either by trying the top on and marking it or measuring down from your shoulder or you can eyeball it. That's what I did. :)
 Cut the center back of the top. I serged the edges but that is not necessary.
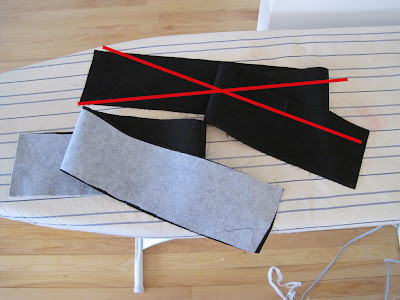
 Cut out your waist band. I added three inches to my natural waist measurement for seam allowance and garment ease. My band was 3.5" wide. Using a 1/2" seam allowance the band on the finished dress is 2.5" wide. (Ignore that second band. I didn't end up using it.) Cut a piece of lightweight fusible interfacing the same size as your band and iron it to the wrong side of your band.
 Pin and baste your waistband to the bottom edge of the shirt (right sides together). Try on the top to see if you like where the band hits you on your body. Adjust if necessary. Once you are happy with it, sew the band to the shirt using a regular stitch. Optional- serge the raw edge.
 TIP: I wish I could have had more gathers in my skirt. Try to find a skirt that is a few sizes larger than your normal size so you will have more material to gather.
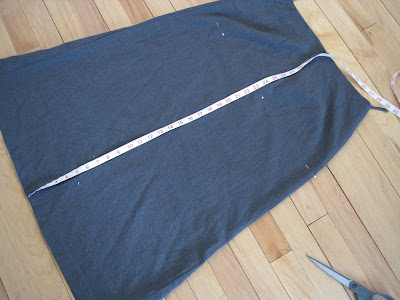
I wanted my skirt to hit right in the middle of my knee. I pinned and cut off the top portion of the skirt (and lining) leaving me with 23" of skirt with the original hem intact.
 I serged the top edge of the skirt and lining, mainly to keep them together. If you don't have a serger do a regular stitch around the top of the skirt.
 Gather the skirt using a long machine stitch (5 on my machine). I like to do two lines of gathering stitches that way if the thread of one breaks you've got a back up. Plus, you get more even gathers with two.
 Lay your zipper on the shirt and measure the over hang of the zipper (7.5 for me) and is how much you will cut open the skirt.
 Mark and cut your zipper opening on the center back of your skirt.
 With right sides together pin and baste the skirt to the bottom side of the band. Try on your dress for fit. Once you are happy with it, sew the band and skirt with a regular stitch and serge raw edges.
 Sew in invisible zipper.
 The zipper is in. I like to pretend that the waistband matched up perfectly. I was too lazy to take it apart and fix it.
For the pockets: Cut out your pocket. Freshly Picked has a perfect sized template if you need one. (She also has much better pictures and directions on how to do a pocket. Go check it out!)
 Open up the side seam where you want your pocket to be. Making your opening slight larger then the pocket piece.
 With the right sides of the skirt and the pocket together, pin and sew with a 1/4" inseam. Repeat for other side of the pocket.
 Sewing the 1/4" inseam
(Please forgive my less than stellar photoshop skillz)

With the right sides of the pockets together, sew the side seam of the skirt that you opened once you get to the pocket lift the presser foot rotate the skirt put the presser foot down and sew around the perimeter of the pocket. Continue back onto the skirt sewing the side seam closed.
 A pocket! Now repeat for the other side of the dress.
A tutorial for the rosette brooch will be up tomorrow.


10 comments:
I still love it as much today! I just need to kick myself in the butt and try something harder. Great job!
You're AMAZING!!!! You made it seem SOOOO simple although I know I would have a cluster mess in my sewing "area"!!!! Looks Fantastic on you!!! Kera
www.hughesxs4.blogspot.com
All I have to say is HOW? How do you have time for this? Did someone kidnap your children? I wish you still lived around the corner from me so you could teach me how to use my serger (that has been sitting here unused for two years! This is AMAZING!
Basically, I love shabby apple dresses and yours is such a cute knockoff :D You are so talented! I wish I could be as talented as you! Cute dress.
Thanks for your comments!
Yes, you need at least a basic knowledge of sewing to do this project, possibly more. But you know Jen that I would be happy to make one for you! You bring the goods, I'll do the sewing.
Jennifer, you crack me up! I worked on this dress here and there for a week. During the day when kids were at school and Ezra was asleep and in the evenings. One night I spent about four hours on it. It sounds like a lot but I find a lot of pleasure in sewing so I don't mind. And believe me, I wish I still lived around the corner too. Oh how I miss Brooklyn! I was the same with my serger at first too. I was totally afraid of it! Mine came with a DVD and I watched that a couple of times and then just started practicing with it.
I have to say...love it!!! And who needs to know it's knock off!
Just found your blog from a link from another blog. Talk about TALENTED. Wow! There is so much amazing stuff here. THANK YOU!
I heard of your blog through a friend and Im glad she told me about it, it's so much fun! I absolutely love this dress! I agree it looks so much better on you than that model that looks starved!
That is such a cute dress, I need to make myself one just like it! Thanks for sharing :).
i have that shabby apple dress...only because i had store credit there (i had bought a bridesmaid dress but the smallest size was way too huge). you are so amazing! i just bookmarked like 10 of your projects. i need to stop blog stalking you and get on with my day already!!! happy fourth!
Post a Comment
Thanks for leaving a comment. I love 'em! They make me feel special! :)
If you have a question make sure you have an email address linked up to your blogger account or leave your email address in the comment so I can respond otherwise I will answer your question here in the comments section.
OR you can email me at suttongraceblog(at)gmail(dot)com
Note: Only a member of this blog may post a comment.