Showing posts with label home decor. Show all posts

Wednesday, January 4, 2012

paint chip art

Back in July Jessica Jones of How About Orange posted about using paint chips to make art. There are many versions of paint chip wall art but I liked her geometric triangles the best.


I decided to make one for Michael for Christmas. I grabbed a few paint chips, made a template and started cutting. My triangles looked like they were all the same size but once I started putting them together and found they were not the same size. Close but not exact. It almost looked cool but I knew the imperfections would bug me.


Enter Plan B. I grabbed a 1 1/4" square punch. Punched out a bunch of squares and sliced them in half, corner to corner. Since I only had to make one cut, all the pieces were the exact same size. Whew! The triangles were a different shape then Jessica's but I was okay with that- 'make it your own' and all that. Plus considering the size of the art I was making it was way faster than cutting by hand.


Then came the fun part, making the design. I played around with the triangles until I found a pattern I liked.  I added a second row to check if I liked how the pattern repeated.


Then I prepared my backing paper with some guidelines to keep everything straight. I sprayed the backing paper with spray adhesive and laid out the pattern, keeping the colors completely random.


This part was really quick and it wasn't long before my paper was full!


I put in in a mat and frame I already had and it was done. Michael was really pleased with it and I like that it sort of looks like a mini-quilt.

(uh, just ignore all that crap under the desk. mmm-kay?)

Tuesday, January 11, 2011

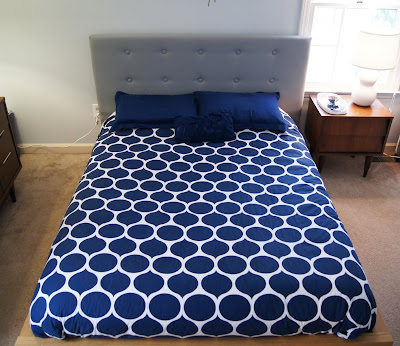
DIY tufted headboard

This a 'sort of' tutorial because I forgot to take pictures of a few steps. It's pretty straightforward though.

I have wanted an upholstered headboard for ages but lacked motivation to make one. With nighttime feedings right around the corner I decided now was the time.

This was our bed before (on a different wall) we've had it for several years. The bed is from IKEA. I didn't hate it but the headboard was so low it wasn't comfortable to lean against and made nursing a baby pretty awkward.

In theory the hidden nightstands are cool but the casters under the nightstands are so small they don't roll on carpet. You have to have wood floors for them to function properly. Had we known this we wouldn't have purchased the bed since our bedroom is carpeted. I don't like the look of the nightstands being out so we just ended up not using them at all- a lot of wasted space.

We considered selling the bed and buying a simple bed frame and supplies to make an upholstered headboard but in the end we decided to just use what we had. We flipped the flat surface of headboard onto the existing headboard. The pieces were the exact same length and width so it worked perfectly.

After securing the pieces together I drilled holes for the button tufts using a 1/2" drill bit. Being that the bed was from IKEA and made from something that isn't actual wood, it was incredibly easy to drill the holes.

Here is the back view:

Here is where I got sloppy and forgot to take pictures.

Using spray adhesive I glued a 1" thick foam (24" wide) piece of foam to the front of the new headboard. I then covered the foam with batting wrapping it around the sides and top and stapling it in place with a manual staple gun.

After this point I was stuck. I couldn't find the fabric I had envisioned for the headboard. I couldn't even find anything out of my price range. It was disappointing. One afternoon Michael and I were wandering around Target and he happened to come across a shower curtain on clearance for $5.98. It was barely large enough to cover the headboard but it worked! I wanted something with a little more texture but this was the exact color that I wanted so we went with it.

I wrapped the fabric around the headboard and stapled on the back side starting the the center top and bottom and sides. Continue stapling the fabric pulling taut but not so taut that it puckers or indents the foam and batting.

For the corners I just folded and tucked until it looked right and stapled.

The tufts were a little challenging to get perfectly level and evenly spaced. This is what worked for us. Keeping it level with floor, poke an awl through the hole (from the back) until it is just pushing against the fabric on the front. Put a straight pin right where the awl is. Remove awl. Repeat for all the holes. Using a measuring tape measure the pins for even spacing. Adjust as needed. It may seem like a lot of steps but if the buttons are even slightly off it's very obvious!

Make your buttons. I used 1 1/2" size.

With embroidery floss (cause that's what I had on hand) threaded through a long needle I pushed the needle through the hole making sure it came out in almost the exact spot where the straight pin was. String the needle through the button and then back through the hole (very close to the entry point of the needle) pulling taut. Staple the strings to the back of the headboard a couple of times then pull in the opposite direction and staple a couple of times for extra security.

Repeat.

I am really happy with the results! It is so comfortable to sit against (which is what I am doing as I type this!).

Cost break down:
Foam & batting $20 (purchased during a 40% off sale at Hancock Fabrics )
Fabric $6
Buttons $10

We already had the spray adhesive, staples and embroidery floss.

Total: $36.

Thursday, July 15, 2010

dining room make over: a little progress

Several weeks ago I made some curtains for the dining room. I copied the style of my Ikea curtains and took pictures along the way so I should be able to write up a tutorial if anyone out there is interested. I found this fabric at my favorite fabric store, Mary Jo's. It is unlike what I usually buy for my home. It is a multicolor floral print. The fabric is made by Richloom, called Invigodk (sometimes labeled as Invigorate) in Confetti. It is currently available here, at Mary Jo's cloth store.


I started the curtains after I found out I was pregnant and got sick shortly after and forced myself to finish them. To this day I feel sick whenever I look at the curtains. I am hoping that one day the urge to vomit will fade. I hate wasting time and money!!


Aside from the curtains, I have painted the dining room (Martha Stewart- Cumulus Cloud) and finished painting the hutch (hint: I didn't go with aqua or green!), now I just have to paint the chairs. The bright yellow I originally wanted to do definitely doesn't go with the muted shades in the curtains. I am thinking orange?

Warning: don't look too close to the curtain rods... I hung the one on the left and many, many days passed until my husband sweetly suggested he hang the one on the right. He carefully measured but somehow the rods are so not level! Maybe some day I will find the energy to fix it. Probably the same day I find the energy to finally hem the curtains on the left!! Until then I will just keep pretending that they are perfect. :)

Thursday, May 13, 2010

thonet chairs

I haven't painted the hutch yet but I have already bought more items to paint! I found six vintage (1943) Thonet style chairs at the same antique store I mocked in this post. I still feel that antique stores are over priced but you can get lucky every now and then. And boy did I get lucky this time! I got the chairs for $25 each for a total of $150 (marked down from $240 so they wouldn't go any cheaper, I did ask though!). I don't usually spend that kind of money but I fell in love with the chairs and they are all in great condition.

Here are some inspiration photos via google (sorry I don't remember the sources):


I am painting my chairs yellow. I finished one a few minutes ago:

I love it! My sister-in-law and brother-in-law painted their dining room chairs (see them here). They are smart though, instead of using spray paint they used an air compressor paint sprayer. I might beg him to let me borrow it. I could save so much time and money!

Update: I just talked to Michael. He likes the chair but he thinks I have a yellow obsession and wants to have an intervention! :) He suggests we have a rainbow assortment of chairs. I am open to the idea but I am afraid that it would look too crazy. Thoughts??

Friday, February 5, 2010

valentines decor

I apologize for the poor quality photos. It is a dark and rainy day here is Charlotte. But since Valentines is only NINE days away I decided to not wait for the weather to clear up.

I am not a huge fan of V-Day. In fact it would annoy me if Michael bought me roses on Valentines Day. Any other day of the year it would be delightful. To me, the gifts and I loves yous don't mean as much if they are given because society dictates. All that being said, there are two things I love about Valentines. Decorating and making it fun for my kids.

puffy heart garland (made this last year) and some faux mercury glass on the mantel.

I had wanted to make a pillow that said "i {heart} you" but after making all the other decor I didn't feel like cutting out and sewing on all those letters so I went with actual heart.


red pom-poms and a puffy 'LOVE" banner also made last year.


framed wrapping paper (this was actually clearanced Christmas paper) and
thrifted
and gifted white vases.


I had originally wanted to make these but I couldn't find any baking cups that I liked, not to mention between the styrofoam balls and the hundreds of baking cups needed it was looking like a pricey craft. So I bought red tissue ($0.99) cut out circles and glued them on the same way. Take that Martha!


Faux mercury glass, another Martha Stewart project. I can't find it on the MS website but someone posted the directions here. I love the idea of this project and I am pleased with how it turned out but it was a pain in the butt to do.


felt "heart stings" pillow, inspiration via my friend Meredith.


Left over hearts from the pillow sewn together.


100% stolen idea from this clever girl. the kids love finding notes each morning in their envelopes.

Wednesday, January 27, 2010

butterflies, polka dots and ruffles- oh my!

We have had the same pillows on our couch for a few years now and I was needing a change. I am not usually a butterfly kind of girl but when I saw Canyon Butterfly by Alexander Henry I decided maybe I will be a butterfly kinda girl. The orange polka dot pillow cover came from Target (only $4!!).

We also hung curtains recently (it's about time, we have lived in this house for almost 5 years!!)


On the other side of the room we have my most recent labor of love:

I saw this pillow on the Dear CJane blog and it has been floating around in my head for awhile. I was glad I chose to make it a small pillow it took a ton of circles to cover the whole thing. I also spent a lot more time then I usually do when making pillow covers. I do love it though, so it was worth it.

Friday, December 11, 2009

the halls are decked!

(they have been for several days actually but I had to tidy the house enough so I wouldn't be embarrassed to take pictures!)


Don't you just love how the bottom 1/3 of the tree is empty? Ah, life with a toddler.

Normally I rearrange all the ornaments after my kids "decorate" the tree but I couldn't do it this year... they were so proud of their work. Every time I look at the tree I smile and cringe at the same time.

My handmade wreath, circle felt garland, and stockings (from Kohls 4 years ago).


Mini bunting. I had so much fun making this. I LOVE it. It's so cheery. (Inspiration) The art gallery has been cleared to make room for the holiday artwork and to display Christmas cards.

Even the kitchen window gets festive!

The foyer and dining room

More bunting and a table runner made from a hand-me-down maternity dress.

The Santa on the sideboard was painted by my Grandmother in 1986. Not my usual style but I love it because it reminds me of her.


I am linking up to The Nester Tour of Homes, Hooked on Houses House Tour 2009 and The Inspired Room.
Related Posts with Thumbnails