Showing posts with label gifts. Show all posts

Thursday, February 9, 2012

retro tv t-shirt

My sweet husband, Michael, celebrated his birthday last month. One of his presents was this retro t.v. t-shirt.


The t-shirt was inspired by one of our all time favorite TV shows, The IT Crowd. It is available on Netflix Instant. I definitely recommend it with one caveat- British TV allows much more foul language than American TV. There are a few F-words sprinkled throughout the series-- less than one an episode. It's like a PG-13 movie. Anyhow, one of the main characters, Roy, wears lots of great t-shirts. This one was my favorite:


I recreated it with freezer paper stencils and fabric paint. This was my first time doing a freezer paper stencil on an adult sized t-shirt. I struggled getting it centered and level, as I am sure you can tell! Little kid t-shirts are much easier. If I hadn't left it to the last minute (literally- I did this the morning of his birthday!) I would have bought a new shirt and tried again. Live and learn, right? I also wish I had made the t.v. a little larger.


I do really love how the antennas and the details of the t.v. (the switches and speaker and legs) turned out though.


Michael was very happy with this present. He put it on immediately and wore it the rest of the night. See all those candles? He's OLD! :)

Thursday, January 26, 2012

perpetual daily journal calendar


I came across this DIY project on Design*Sponge sometime last year and purchased all the supplies for it but decided to wait until the new year to start. Of course I forgot all about it until a week or so ago when I was cleaning my sewing table and came across the adorable red berry basket I had purchased.


I bought the vintage post cards at my favorite local over priced antique store. They had some beautiful cards but they were in the $2-4 price range. Since I was going to be cutting the cards to size and they were only being used at dividers not framed art I decided to pick some from the 50 cent basket!


I quickly threw it all together and played catch-up for the first few weeks of the year that I had missed.


Now that I am caught up I can just jot down a highlight or lowlight or a funny quote from the day. It's completely simple and doable and is just what I needed because I have gotten so lazy in journaling the milestones of my family.


I have a feeling it is going to be a very rewarding and entertaining project in the years to come!

Wednesday, January 4, 2012

paint chip art

Back in July Jessica Jones of How About Orange posted about using paint chips to make art. There are many versions of paint chip wall art but I liked her geometric triangles the best.


I decided to make one for Michael for Christmas. I grabbed a few paint chips, made a template and started cutting. My triangles looked like they were all the same size but once I started putting them together and found they were not the same size. Close but not exact. It almost looked cool but I knew the imperfections would bug me.


Enter Plan B. I grabbed a 1 1/4" square punch. Punched out a bunch of squares and sliced them in half, corner to corner. Since I only had to make one cut, all the pieces were the exact same size. Whew! The triangles were a different shape then Jessica's but I was okay with that- 'make it your own' and all that. Plus considering the size of the art I was making it was way faster than cutting by hand.


Then came the fun part, making the design. I played around with the triangles until I found a pattern I liked.  I added a second row to check if I liked how the pattern repeated.


Then I prepared my backing paper with some guidelines to keep everything straight. I sprayed the backing paper with spray adhesive and laid out the pattern, keeping the colors completely random.


This part was really quick and it wasn't long before my paper was full!


I put in in a mat and frame I already had and it was done. Michael was really pleased with it and I like that it sort of looks like a mini-quilt.

(uh, just ignore all that crap under the desk. mmm-kay?)

Tuesday, November 29, 2011

custom pendant necklaces

When I was purchasing supplies for my clip on earring ring I noticed some bezel set pendants in the jewelery findings section but didn't think much of it until I saw these necklaces at Uncommon Goods. I thought they were cool but... $145. Gulp. That is a lot of money! The next day I ran to Hobby Lobby and picked up supplies (luckily they were 50% off that week. Score!).


I loved the map idea but there aren't many geographical locations that are important enough to me to wear around my neck. Maybe something from Brooklyn. I think I might try to scrounge up an old NYC Subway map and make a necklace with my old subway stop (7th Ave and 9th Street on the F Train) but since I didn't have a subway map on hand I used other items I had lying around:


The solid colors are nail polish (the small dark one is purple though it appears black in the photos). The dark blue/yellow print is from a Thank You card from my sister-in-law. The zig-zag and striped prints are from the cover of Michaels Pratt Institute Alumni Magazine (he was so nice about letting me cut it up!). The little multi-colored pendant is from the Flip diaper box. I had saved it because I loved the colors.


Cut out the template provided with the package. Trace onto your image and carefully cut out.


Glue onto your pendant. Let dry. Apply a layer of Dimensional Magic Mod Podge. Let it dry overnight. Add another layer. Let dry overnight again. Continue until you reach the desired thickness of mod podge. The 3D mod podge says it has a three hour dry time but I found that it needs to dry overnight and with the multiple layers needs another few days to fully cure or it tends to develop cracks.

If you are using nail polish, simply paint the bottom interior of your pendant allow it to dry completely and continue with the Dimensional Mod Podge.


They only thing I don't like about the 3D mod podge is the colors become muted. My bold multi colored diaper box pendant turned out pastel but it's still one of my favorites.


One of these pendants would make a simple and cute gift for that sister/friend/mother on your Christmas list!

Friday, August 12, 2011

birthday totes

Each year I have one item that I make for my sisters and sisters-in-law birthdays (though I admit that I have missed a birthday or two. Sorry sisters!) This year the gift is tote bags! You can find the tutorial here if you want to make your own.

Two of my sisters-in-law celebrate their birthdays this month. Jen's birthday was the 4th. I made her a yellow chevron with brown trim tote bag. I love the yellow chevron! I got it at Hancock for 50% off. The trim is a brown linen I've had for years and the lining is a white canvas. Jen recently moved to Asheville, NC and I am missing her lots!


Today is Jessica's birthday. (Happy birthday Jessica!!) She is pretty amazing- she has four children, teaches preschool, and is finishing up her masters degree. She is a superwoman!

I made Jess' tote bag in brown linen from my stash. The trim and lining fabric is Flea Market Fancy Sprout by Deniyse Schmidt, one of my favorites, which sadly, is no longer available. I made a dress for Sutton years ago (pre blog days) and after making this bag I only have scraps.

HAPPY WEEKEND!

Wednesday, June 15, 2011

simple tote bag tutorial

Don't forget to enter the tote + pouch giveaway- it ends Friday!


I needed to sew another tote bag so I could write up a tutorial. It was the perfect excuse to make a tote for myself, it's been a long time since I have sewn something just for me! I added a sweet little 'W' monogram.


I will probably use the bag primarily for trips to the library, although I did use it for a solo trip to the fabric store last night. I put my cellphone, keys and wallet in the front pockets and my purchases in the main part. It was great not having to carry my big purse/diaper bag and a separate shopping bag.

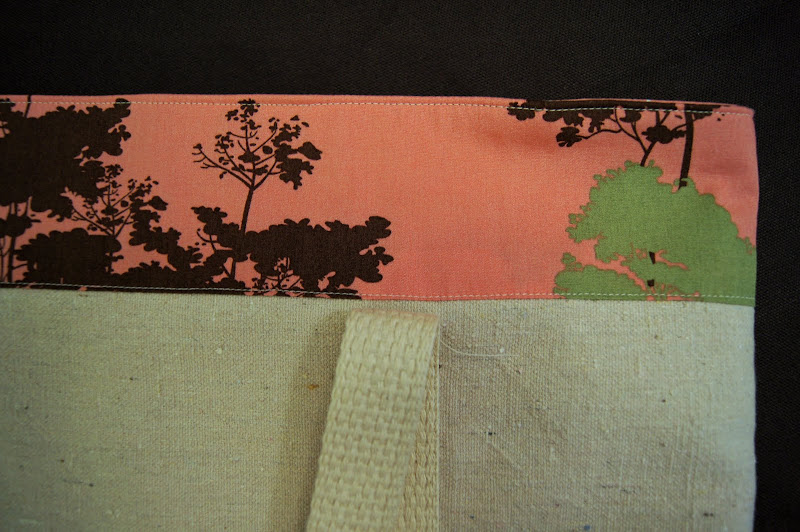
I used a lighter weight canvas for the body of the bag. The bag is fully lined with a 100% cotton print- Carnaby Street by Robert Kaufman. I bought it years ago at a quilting store that was going out of business.


This tutorial is very flexible. Make the bag wider, bigger, smaller. Make the boxed bottom wider or don't box it at all, leave it flat.

I hope my directions make sense. It's hard to gauge because it, of course, makes sense to me. I could ask my husband but that would be the equivilant of him asking me to code a website. So, if anything doesn't make sense, please ask. I am happy to clarify or help in anyway. As always, if you make a tote send me pictures. I love seeing your projects. In fact, I have been considering jumping on the bandwagon and starting a Flickr group for projects created by you with my tutorials...


On with the tutorial:

Cut out:
main bag pieces- two 18"x18"
lining pieces- two 18"x18"
front pocket piece- 18"x9.5"
contrasting trim- two 18"x4"
contrasting pocket trim- 18"x3"
1" cotton webbing- two 61" lengths


Fold and press the pocket trim piece in half, open it up and fold & press each side to the center crease. Sandwich the pocket piece between the layers. Stitch close to the edge.


Fold and press the bottom edge of each trim piece 1/2". Place the trim piece on top of the front main piece, matching up the raw edges. Stitch near the bottom folded edge of the trim piece. Repeat for the other main piece.


For a tote with three front pockets, layer the strap piece over the pocket on top of the front main piece. Sew down each side of the strap from the bottom of the trim piece to the bottom of the bag- do not sew on the trim piece.

The strap should be 5" in from each edge.


For a tote with just two front pockets (perfectly sized to fit bulky board books), sew the strap directly to the front main piece. Repeat for the back main piece. Again, don't sew the strap to the trim at the top.


Then sew the pocket piece on top of the straps, one stitch down the center of the pocket.


With right sides together, sew around the perimeter of the bag leaving the top open. Before you sew make sure your front and back trim pieces line up, your finished bag will look much better if you do.


To box the bottom of the bag, take one bottom corner and pinch together so the side seam and the bottom seam are lined up. Measure in two inches from the corner (the corner of the seam, not the raw edges), mark and sew. Cut excess. Repeat for the other corner. Turn right side out and press.


Sew the front and back lining pieces together leaving the top open and a 6" opening at the bottom. Box the bottom.


With right sides together, put the lining inside the bag, matching side seams and raw edges. Make sure the straps are tucked in side the tote. Pin and sew.


Using the 6" opening in the lining turn the tote right side out. Press and top stitch around the top of the tote.


Now sew the strap to the trim at the top of the bag. Start where your stitch ended previously and sew + backstitch 2-3 times and the top to reinforce the seam. Continue to the point where your stitch previously ended on the other side of the strap.


Stitch the 6" opening in the lining closed.

Done and done!

Wednesday, June 1, 2011

'tote'-ally!

I made a few tote bags recently (similar to these ones I made last year as teachers gifts). All the crafting/sewing blogs I read come up with cute names for the shirts/dresses/bags/whathaveyou that they make. I wracked my brain for days and came up with... nothing. Hence the lame post title, "'tote'-ally". I would never make it in the advertising world!

I used dark gray canvas for the body of each bag and white cotton webbing for the straps. For the trim and lining on the first bag I used a Dwell Studio pillow case (still in it's original package) I found at Salvation Army.


The black and white polka dot fabric is Huevos by Michael Miller.


The floral fabric is by Brother Sister Design Studio available at Hobby Lobby.


The straps are sewn onto the outside of the tote which creates three exterior pockets. The inside has no dividers, just one large tote with a boxed bottom. Perfect for the library, a trip to the park or even the store.

Let's just pretend the webbing matches perfectly at the bottom, shall we?

The first tote is for my youngest sister, a belated birthday present. She is a new mom and you can never have enough bags when you have a newborn, right? It always amazes me how much stuff you have to cart around for someone so little!

The second tote is for Liam's end of year teacher gift to his 2nd grade teacher.

The third tote is for one of you! I am finally making good on my promise to have occasional giveaways. Check back later in the week (or maybe Monday. You know I'm a lazy blogger, right?) for the official giveaway. There will be another cute little item to go along with the tote!

Thursday, May 5, 2011

embellished scissors

I got this idea from the always talented Char at Crap I've Made. I think embellished scissors make a perfect teacher appreciation gift. Practical + useful, original and inexpensive all in one cute little package!


The scissors are very simple to make. Cut out and glue paper to the outside of the blades. Sand the edges to get excess paper off. Apply Dimensional Magic, let dry. Easy!


I had never heard of Mod Podge Dimensional Magic before but I love the stuff now! It has a really nice thick, super glossy finish. It was really easy to use too.


Unlike Char, I don't have a Silhouette and my printer recently kicked the bucket. I had to go with the super low tech scissors and pen to make the tags. Not the cutest but it works.


I had Sutton write her name on the tags. I love her preschool handwriting. Especially the backwards S. I tried to be a good parent and show her (again) which way the S should face but secretly, I think the reversal is sweet!
Related Posts with Thumbnails