When I was purchasing supplies for my clip on earring ring I noticed some bezel set pendants in the jewelery findings section but didn't think much of it until I saw these necklaces at Uncommon Goods. I thought they were cool but... $145. Gulp. That is a lot of money! The next day I ran to Hobby Lobby and picked up supplies (luckily they were 50% off that week. Score!).
I loved the map idea but there aren't many geographical locations that are important enough to me to wear around my neck. Maybe something from Brooklyn. I think I might try to scrounge up an old NYC Subway map and make a necklace with my old subway stop (7th Ave and 9th Street on the F Train) but since I didn't have a subway map on hand I used other items I had lying around:
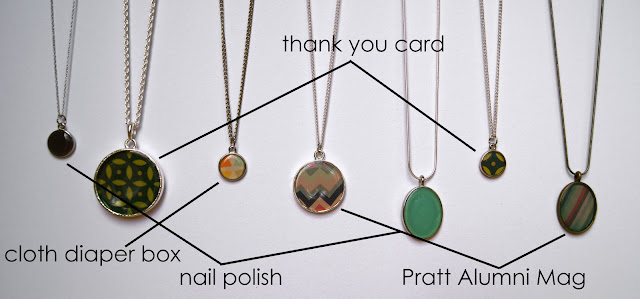
The solid colors are nail polish (the small dark one is purple though it appears black in the photos). The dark blue/yellow print is from a Thank You card from my sister-in-law. The zig-zag and striped prints are from the cover of Michaels Pratt Institute Alumni Magazine (he was so nice about letting me cut it up!). The little multi-colored pendant is from the Flip diaper box. I had saved it because I loved the colors.
Cut out the template provided with the package. Trace onto your image and carefully cut out.
Glue onto your pendant. Let dry. Apply a layer of Dimensional Magic Mod Podge. Let it dry overnight. Add another layer. Let dry overnight again. Continue until you reach the desired thickness of mod podge. The 3D mod podge says it has a three hour dry time but I found that it needs to dry overnight and with the multiple layers needs another few days to fully cure or it tends to develop cracks.
If you are using nail polish, simply paint the bottom interior of your pendant allow it to dry completely and continue with the Dimensional Mod Podge.
They only thing I don't like about the 3D mod podge is the colors become muted. My bold multi colored diaper box pendant turned out pastel but it's still one of my favorites.
One of these pendants would make a simple and cute gift for that sister/friend/mother on your Christmas list!
Showing posts with label jewelery. Show all posts
Showing posts with label jewelery. Show all posts
Tuesday, November 29, 2011
custom pendant necklaces
Monday, November 7, 2011
DIY ring
I have made a goal to start accessorizing more and I hear Forever 21 is the place to go for cute, cheap accessories. So I made a trip to the mall. I rarely go to malls. I really dislike them but I am a sucker for cheap things... so to the mall I went. I found two cute necklaces but that was it. I really wanted a cute ring to wear but all the rings at Forever 21 were HUGE. Not at all realistic. I'm a mom. I change poopy diapers, do dishes, wipe noses, play Go Fish!, and tickle my kids all day. I can't imagine doing all that with a golf ball sized plastic rose attached to my finger! So I decided to make my own ring:
I started with a pair of vintage clip on earrings. One has several stones missing so I was able to talk the price down to $3. I'll keep the extra around as a back up in case my ring loses stones.
I bought a ring in the jewelery findings section of Hobby Lobby for $1.47.
I removed the clip on part of the earring and glued it to the ring. I used Gorilla Glue because I was out of E-6000. You have to be careful with Gorilla Glue though because it expands as it dries.
I love my new ring! It is just big enough for me; large enough to be eye catching but small enough for daily wear. It cost me $4.47 and a few minutes of my time. Best of all, it is completely unique.
don't you love my wintertime dry, scaly hands?
I started with a pair of vintage clip on earrings. One has several stones missing so I was able to talk the price down to $3. I'll keep the extra around as a back up in case my ring loses stones.
I bought a ring in the jewelery findings section of Hobby Lobby for $1.47.
I removed the clip on part of the earring and glued it to the ring. I used Gorilla Glue because I was out of E-6000. You have to be careful with Gorilla Glue though because it expands as it dries.
I love my new ring! It is just big enough for me; large enough to be eye catching but small enough for daily wear. It cost me $4.47 and a few minutes of my time. Best of all, it is completely unique.
Thursday, August 26, 2010
earring overload
Making earrings is my new obsession! Last time I posted about button earrings I was surprised by the comments that so many of you have crooked piercings in your ears! What a bummer! Then I remembered that the my second set of piercings was off center too but I let them close up years ago. Are multiple ear piercings even in anymore? I have no clue!
I bought a bunch of plastic rose cabochons from etsy seller PrettyLovelies.

The yellow roses are my favorite (of course!) and I wear them constantly.

I made these earrings for my youngest sister who celebrated her birthday WAY back in May. I was kind of embarrassed to send a gift that late but she seemed pleased!

I bought a bunch of plastic rose cabochons from etsy seller PrettyLovelies.

The yellow roses are my favorite (of course!) and I wear them constantly.

I made these earrings for my youngest sister who celebrated her birthday WAY back in May. I was kind of embarrassed to send a gift that late but she seemed pleased!

Thursday, August 5, 2010
button earrings
I occasionally foray into the world of jewelery making but I have only made necklaces and bracelets. I first saw the idea for button earrings here. I like my earrings to be pretty simple and had a hard time finding buttons that I liked. When I spotted these tiny pale blue discs I thought they would be perfect.
I removed the button shank with a pair of jewelery making pliers.
Add a dollop of glue to the post (I bought my earring posts from Hobby Lobby). I used E-6000 an industrial strength glue. I am hoping that it will be more durable than hot glue. I have bad luck with hot glue in the past.
Repeat for the other button, let the glue set and you're done!

Cute and simple! Perhaps even bordering on plain but I love it.


