Showing posts with label i made it. Show all posts

Thursday, February 9, 2012

retro tv t-shirt

My sweet husband, Michael, celebrated his birthday last month. One of his presents was this retro t.v. t-shirt.


The t-shirt was inspired by one of our all time favorite TV shows, The IT Crowd. It is available on Netflix Instant. I definitely recommend it with one caveat- British TV allows much more foul language than American TV. There are a few F-words sprinkled throughout the series-- less than one an episode. It's like a PG-13 movie. Anyhow, one of the main characters, Roy, wears lots of great t-shirts. This one was my favorite:


I recreated it with freezer paper stencils and fabric paint. This was my first time doing a freezer paper stencil on an adult sized t-shirt. I struggled getting it centered and level, as I am sure you can tell! Little kid t-shirts are much easier. If I hadn't left it to the last minute (literally- I did this the morning of his birthday!) I would have bought a new shirt and tried again. Live and learn, right? I also wish I had made the t.v. a little larger.


I do really love how the antennas and the details of the t.v. (the switches and speaker and legs) turned out though.


Michael was very happy with this present. He put it on immediately and wore it the rest of the night. See all those candles? He's OLD! :)

Thursday, January 26, 2012

perpetual daily journal calendar


I came across this DIY project on Design*Sponge sometime last year and purchased all the supplies for it but decided to wait until the new year to start. Of course I forgot all about it until a week or so ago when I was cleaning my sewing table and came across the adorable red berry basket I had purchased.


I bought the vintage post cards at my favorite local over priced antique store. They had some beautiful cards but they were in the $2-4 price range. Since I was going to be cutting the cards to size and they were only being used at dividers not framed art I decided to pick some from the 50 cent basket!


I quickly threw it all together and played catch-up for the first few weeks of the year that I had missed.


Now that I am caught up I can just jot down a highlight or lowlight or a funny quote from the day. It's completely simple and doable and is just what I needed because I have gotten so lazy in journaling the milestones of my family.


I have a feeling it is going to be a very rewarding and entertaining project in the years to come!

Monday, January 16, 2012

vegetable sushi roll

Over the weekend I had my first attempt at making sushi. It was fantastic and surprisingly easy! I followed this recipe for the rice though I wish I hadn't as it didn't call for enough water and the rice was slightly undercooked. I should have followed the directions on the rice bag (duh!) as it called for a half cup more water.

I bought my supplies at a local asian market. Everything was very inexpensive and the man running the store was very kind to give me some sushi making tips; wrap the bamboo mat completely with plastic wrap. Lay out an even layer of rice and press down firmly. Keep a bowl of water near by, rice won't stick to wet fingers.

Lay a sheet of nori paper over the rice and add your filings of choice. I made mine with carrots, cucumber, green beans and avocado. Seems like a strange combination but it was delicious! I, personally, wouldn't use raw fish when making sushi at home. It makes me nervous.

Once you have layed out the filling, start with the edge closest to you and roll as tightly as possible.

Roll your roll in sesame seeds.

Using a very sharp knife slice your roll, wiping the knife between each cut.

Serve with soy sauce, wasabi and sriracha hot chili sauce. Enjoy!


Have you made sushi before? What are your favorite combinations of fillings?

Wednesday, January 4, 2012

paint chip art

Back in July Jessica Jones of How About Orange posted about using paint chips to make art. There are many versions of paint chip wall art but I liked her geometric triangles the best.


I decided to make one for Michael for Christmas. I grabbed a few paint chips, made a template and started cutting. My triangles looked like they were all the same size but once I started putting them together and found they were not the same size. Close but not exact. It almost looked cool but I knew the imperfections would bug me.


Enter Plan B. I grabbed a 1 1/4" square punch. Punched out a bunch of squares and sliced them in half, corner to corner. Since I only had to make one cut, all the pieces were the exact same size. Whew! The triangles were a different shape then Jessica's but I was okay with that- 'make it your own' and all that. Plus considering the size of the art I was making it was way faster than cutting by hand.


Then came the fun part, making the design. I played around with the triangles until I found a pattern I liked.  I added a second row to check if I liked how the pattern repeated.


Then I prepared my backing paper with some guidelines to keep everything straight. I sprayed the backing paper with spray adhesive and laid out the pattern, keeping the colors completely random.


This part was really quick and it wasn't long before my paper was full!


I put in in a mat and frame I already had and it was done. Michael was really pleased with it and I like that it sort of looks like a mini-quilt.

(uh, just ignore all that crap under the desk. mmm-kay?)

Tuesday, November 29, 2011

custom pendant necklaces

When I was purchasing supplies for my clip on earring ring I noticed some bezel set pendants in the jewelery findings section but didn't think much of it until I saw these necklaces at Uncommon Goods. I thought they were cool but... $145. Gulp. That is a lot of money! The next day I ran to Hobby Lobby and picked up supplies (luckily they were 50% off that week. Score!).


I loved the map idea but there aren't many geographical locations that are important enough to me to wear around my neck. Maybe something from Brooklyn. I think I might try to scrounge up an old NYC Subway map and make a necklace with my old subway stop (7th Ave and 9th Street on the F Train) but since I didn't have a subway map on hand I used other items I had lying around:


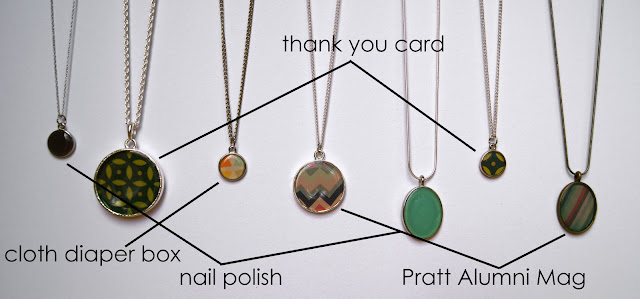
The solid colors are nail polish (the small dark one is purple though it appears black in the photos). The dark blue/yellow print is from a Thank You card from my sister-in-law. The zig-zag and striped prints are from the cover of Michaels Pratt Institute Alumni Magazine (he was so nice about letting me cut it up!). The little multi-colored pendant is from the Flip diaper box. I had saved it because I loved the colors.


Cut out the template provided with the package. Trace onto your image and carefully cut out.


Glue onto your pendant. Let dry. Apply a layer of Dimensional Magic Mod Podge. Let it dry overnight. Add another layer. Let dry overnight again. Continue until you reach the desired thickness of mod podge. The 3D mod podge says it has a three hour dry time but I found that it needs to dry overnight and with the multiple layers needs another few days to fully cure or it tends to develop cracks.

If you are using nail polish, simply paint the bottom interior of your pendant allow it to dry completely and continue with the Dimensional Mod Podge.


They only thing I don't like about the 3D mod podge is the colors become muted. My bold multi colored diaper box pendant turned out pastel but it's still one of my favorites.


One of these pendants would make a simple and cute gift for that sister/friend/mother on your Christmas list!

Thursday, November 10, 2011

mod podge shoes


I have been wanting to mod podge shoes for a couple of years and I finally got around to it!


Michael bought me these shoes about six years ago. They are some el-cheapo bronze ballet flats from Aeropostale but they are super comfy and I have loved them! I just couldn't wear them anymore, they were super thrashed. I was hoping that mod podging the shoes would extend their life a little.


I cut off the straps and used a thin piece of cardboard to fill the little keyhole opening.


I bought the cheerful fabric at Hobby Lobby. I followed this tutorial from Make It and Love It.


I was worried that the mod podge would make the shoes really stiff. They are a little stiff but still comfortable. Yay! Here's to another six years of these shoes. That is if the soles don't wear out first. :)


I've never worn such colorful shoes but I really like them. They're great with jeans and a simple t-shirt. Have you ever mod podged shoes? Would you wear multicolored shoes?

Monday, November 7, 2011

DIY ring

I have made a goal to start accessorizing more and I hear Forever 21 is the place to go for cute, cheap accessories. So I made a trip to the mall. I rarely go to malls. I really dislike them but I am a sucker for cheap things... so to the mall I went. I found two cute necklaces but that was it. I really wanted a cute ring to wear but all the rings at Forever 21 were HUGE. Not at all realistic. I'm a mom. I change poopy diapers, do dishes, wipe noses, play Go Fish!, and tickle my kids all day. I can't imagine doing all that with a golf ball sized plastic rose attached to my finger! So I decided to make my own ring:
don't you love my wintertime dry, scaly hands?

I started with a pair of vintage clip on earrings. One has several stones missing so I was able to talk the price down to $3. I'll keep the extra around as a back up in case my ring loses stones.

I bought a ring in the jewelery findings section of Hobby Lobby for $1.47.

I removed the clip on part of the earring and glued it to the ring. I used Gorilla Glue because I was out of E-6000. You have to be careful with Gorilla Glue though because it expands as it dries.

I love my new ring! It is just big enough for me; large enough to be eye catching but small enough for daily wear. It cost me $4.47 and a few minutes of my time. Best of all, it is completely unique.

Thursday, November 3, 2011

foolproof cake decorations

When I asked Ezra what kind of cake he wanted for his birthday he would give me vague weird answers so I was on my own. I usually try to make whatever kind of birthday cake the kids can dream up but since Ez didn't seem to care I decided to go simple to make it easy on myself as we had a busy weekend. I decided to make sports equipment since Ezra is into all things sports. It was so quick and easy and really fun to do.


I went with a simple 'Happy Birthday Ezra' on top.


Basketball


Soccer


Golf


Tennis


Baseball


I'm not kidding when I said it was quick and easy. The writing and the sports equipment took about ten minutes to do. Getting everything set up (finding and printing the images, melting the chocolate) took longer that making the words and sports gear.

You can use any type of shape or picture. The sky's the limit. I used a unicorn below as an example of a more girl-y version.

Here's how to do it:
Print your image. Lay a sheet of parchment paper over your image or words (wax paper should work too). I used cheap-o chocolate almond bark. Melt it in the micro or over a double boiler. Fill a pastry bag fitted with a #2 tip.


Outline your image with the melted chocolate.


Let the chocolate cool for a 10-15 minutes before handling. Lightly press onto a freshly frosted cake. That's it. I told you it was easy!


How cute would several of these unicorns be lined up on the outside of a cake? If you don't want to use brown buy the white chocolate flavored bark and use food coloring oils (not regular food coloring!) for a custom color.


Whatever shape you make, just make a lot because all the kids will want one to go with their piece of cake. I guarantee it!
Related Posts with Thumbnails