Sunday, December 26, 2010

white christmas!

We got snow for Christmas! Well, most of it came Christmas night and the morning of the 26th but I am counting it as a white Christmas.


The kids has lots of fun playing outside and sledding down the steep hill in the front yard. Luckily Michael was home and played with them outside while I stayed cozy and warm in the house making oatmeal and hot cocoa! :)


I hope you all had a special day yesterday spent with the ones you love! Merry Christmas!

Thursday, December 23, 2010

making a doll house - part 4

It's done! And with a whole day to spare! I am actually glad I didn't finish it weeks ago now I won't have to wait long to see Sutton's reaction when she sees the dollhouse for the first time. It's all she has asked for for Christmas.

I have been working on it in my bedroom but Sutton started getting suspicious so Michael (who is a much better liar than I am) came up with a cover story. He told her I was making a bird sanctuary for Aunt Jen. I could tell that she totally bought it because she was so disappointed that what I was working on wasn't for her! Normally, I don't lie to my kids but Christmas presents are an exception!

Anyhow, I am really happy with the finished doll house. Check it out:

I added window boxes.

I bought a piece of 1"x2" wood for $1.68 and cut it down to size with a 50 degree angle on the ends. Then I drilled holes for the flowers. The flowers were $3. Then I used Gorilla Glue to attach the boxes to the house.

I mod podged a picture of windows to the middle bedroom. It really helps to distract from the shoddy wallpapering job. :)

I made the bed from unfinished wood pieces from Hobby Lobby and then painted it white. I made the bedding using scraps of fabric from my stash.

The yellow bedroom got an identical bed and some scrap bedding too.

I love how the flowers are visible from the inside.

I also made a few throw pillows for the couches and chair.

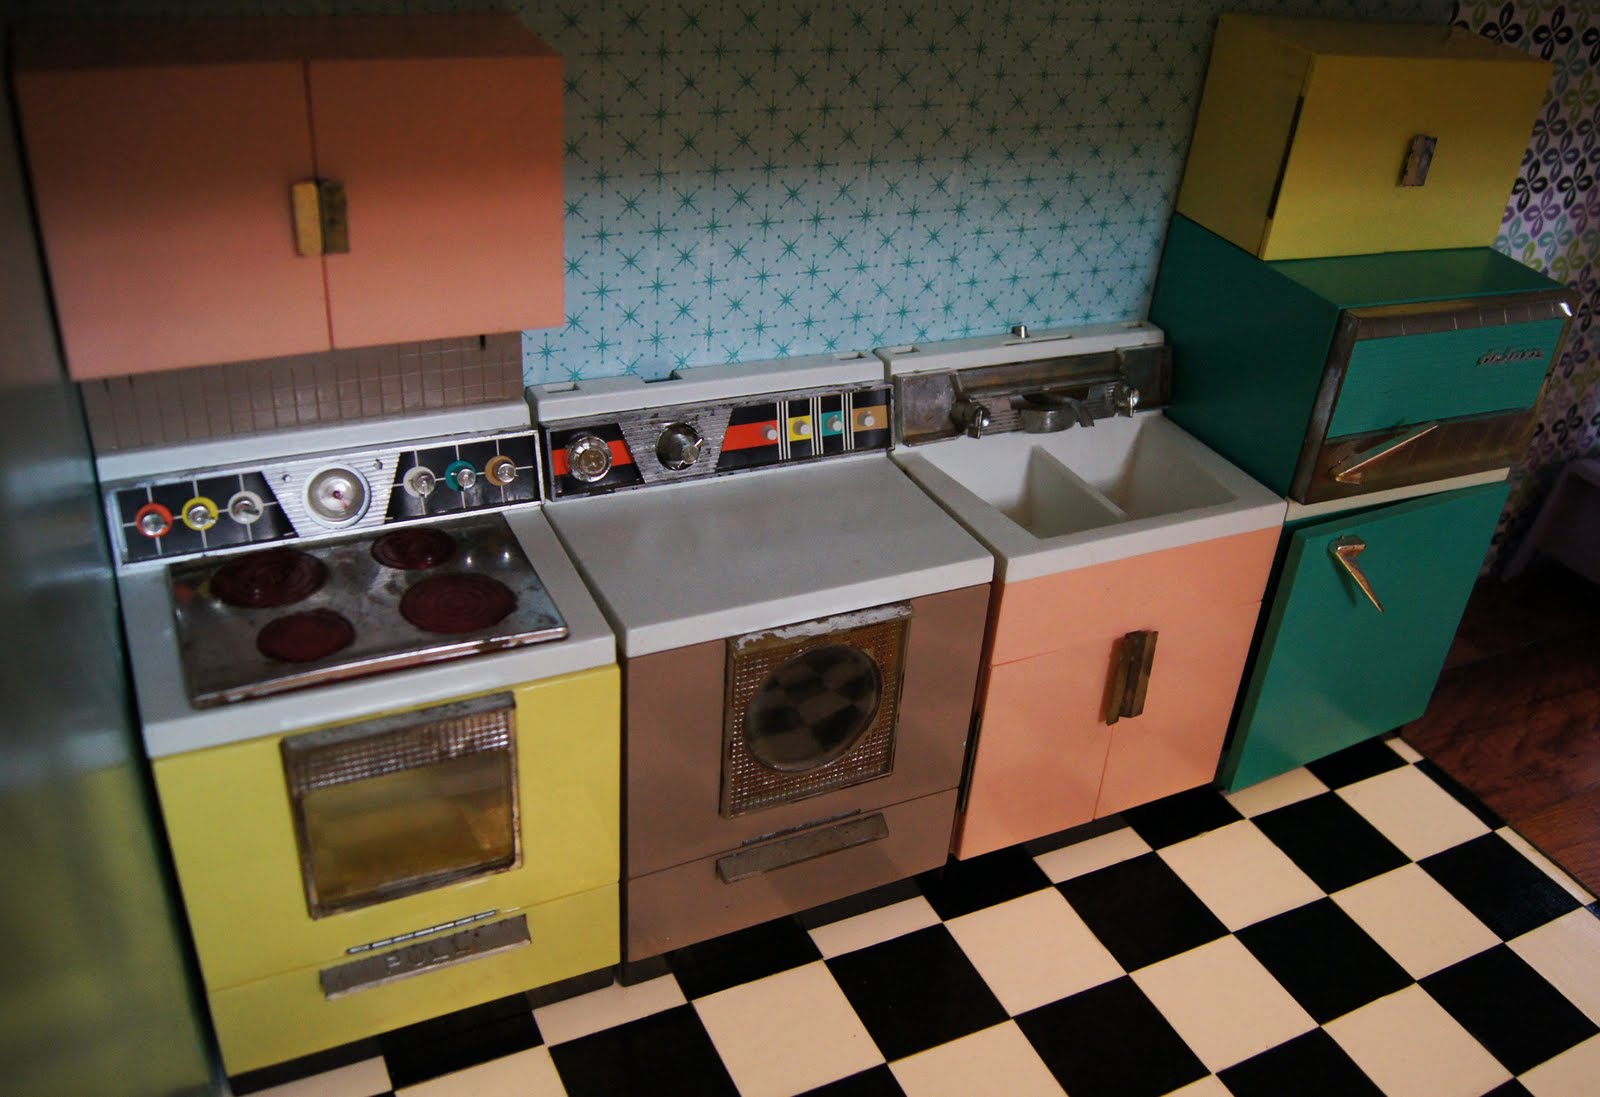
I mod podged another window above the sink. Now Barbie has something nice to look at while she washes dishes. P.S.- I wish my backyard looked like that picture!!

Done and done!

I can't wait for Christmas morning. I swear, I haven't been this excited about a Christmas since I was a girl. Having kids makes giving Christmas presents so fun!

After Christmas I will do a Part 5 post with the "blueprint" of the house for any of you that would like to make your own. I will also do a cost break down.

Sutton's preschool teacher gave us some hand-me-down Barbies which I totally appreciate but they are all naked. I had intended to make a bunch of clothes like Jess did but I have run out of time. I am too cheap to pay store prices (not to mention how slutty most Barbie clothes are) so we will have lots of in 'the buff' Barbie playing at our house! :)

Tuesday, December 21, 2010

making a doll house - part 3

Part 3 is my favorite so far! Furniture and fixtures.

This is the kitchen. It is vintage 1960's. It's called "Barbie Deluxe Reading Kitchen". I love anything vintage but this style kitchen is special to me. My mom had this set when she was a girl and when my sisters and I were little she would take it out of the box and let us look at it and play with all the little pieces. I loved this kitchen and it left an impression on me. So when I decided to build Sutton a doll house I knew I wanted it to have a kitchen just like my mom's.

Unfortunately, they are quite the collectors item now and complete (and in good condition) sets can be very expensive. I was able to get a non-complete set that is a little broken for a great price on eBay. I am okay with it not being complete and some of the upper cabinets broken off. I figure my kids will inevitably break it anyway!


I hot glued the kitchen pieces to the back wall of the house. Hopefully they will last a little longer if they stay in the house!


The table and chairs are not original to the set. They were orange when I got them and I used Krylon's plastic spray paint. It was the first time I had ever used it and it covered like a dream!


I forgot to take a before picture but this is one of the listing pictures from the eBay auction. You can see one orange chair.


Using the plastic spray paint again I painted one of the couches and lounge chair purple and the other couch white.


The painted furniture in the house.


If there is one thing in the house that is over the top and unnecessary it would be the bathroom. I just couldn't resist, it's too cute!

(keep it clean Barbie! this is a family friendly blog!)

The toilet cracks me up! I hot glued the bathroom fixtures to the floor/walls like I did the kitchen. The rest of the furniture can be moved around.


Part 4: 'the finishing details' coming soon!

Friday, December 17, 2010

easy christmas shirts

My kids love having holiday themed shirts. In fact, I was able to get Liam out of bed today, with a smile on his face, by reminding him that he gets to wear his Rudolph shirt to school (he takes after his mom and is NOT a morning person!).

I like to keep the shirts simple, white T's with a one graphic image, for two reasons: I like the way it looks and they are EASY.

Liam requested Rudolph. I did a google image search and found a cute silhouette and made a freezer paper stencil. I didn't feel the need to do a tutorial. This idea has been popular for a while but in case you have never tried it need a tut you can find a good one here.

Liam's shirt is a little small. Rather than buying a new white shirt I decided to use his Mime shirt from Halloween not realizing he had grown so much in less than two months! Oops! Too late now.

Michael was the inspiration for Sutton's shirt. It was the night before her class party and I realized I had forgotten to make her a shirt. Michael suggested tying red ribbon into a bow and gluing it to Sutton's shirt. Then I remembered that I had left over fabric from the ribbon candy pillow and thought it would make a super quick and cute candy cane applique. I just stuck the (untied) ribbon under the applique and ironed and sewed the applique on like normal. Tied a bow, did a couple of stitches by hand into the knot to keep it tied and heat sealed the ends of the ribbon.

Ezra's shirt is a hand-me-down. Sutton wore it last Christmas but I actually made it for Liam when he was in preschool back in December 2007. It was probably one of the first freezer paper stencil T's I ever made. I did touch up the paint because it had faded a bit from being washed so much but it's holding up great considering.

So if you have a kid and a white T laying around whip up a Christmas shirt for him/her. It'll take a small amount of time and it will make their day, I promise!
I love this picture! Liam's belly showing, Sutton and Ez looking at each other... it's one that makes me smile and think about how much I love them. A fact that I occasionally need to be reminded of! :)

Thursday, December 16, 2010

making a doll house - part 2

First off, my apologies for the super crappy pictures. I took them last night and the lighting was terrible. Normally, I would wait until morning to take pictures but I knew that would be pointless since it is a dark and rainy day today.

WALLPAPER: I simply mod podged scrapbook paper to the walls.

The empty spot where the plywood is showing through is where the "kitchen" is going to be.

On top is the yellow bedroom, beneath that is the living room.

The middle upstairs room was the first room I "wallpapered" and I just slapped it on not even trying to match the pieces. It REALLY bothers me so I was much more careful with the other rooms. I am trying to not let it bother me so much that have I re-do it.


FLOORING:
I really love the black and white checkerboard kitchen floor. I cut two 12x12 pages of card stock into 2" squares and mod podged it on.

For the "wood" floor of the living room I bought three stick on linoleum tiles ($0.88/each). I didn't like the parquet look so using a box cutter, I cut along the lines to get planks.

I had to then cut a few more down to fit the room, peeled of the backing and suck 'em on.

The "bathroom" floor is a plastic faux tile floor used for miniature doll houses. I bought it during a 50% off sale at Hobby Lobby.

I made a template for the carpet by taping pieces of paper together.

Traced the template onto the back of the carpet.

Cut along the lines with the box cutter and hot glued in place. I got the carpet samples for $1 each at a local carpet store.


Part 3 coming soon!

Friday, December 10, 2010

making a doll house - part 1

I am the second of four girls. When I was growing up my parents made us a Barbie house. It wasn't anything fancy but we loved it (in fact, I am sure I played dolls long after I was too old to do so). Before the doll house my parents also built us a play kitchen. My parents are great DIY'ers and have inspired me many times.

The last six months or so Sutton has really gotten into Barbies so I decided to build her a doll house for Christmas. I have finally gotten started. I couldn't do this project without the help of my husband. He's such a good sport to help me with my (often harebrained) projects!


First, I sketched out a the house design. Then we bought a $20 piece of plywood. I measured and drew all the pieces onto the board. I actually measured, drew, erased and repeated about twenty times and once it seemed right Michael cut it all out. My repeated measuring mostly paid off there were only a few pieces that need to be cut smaller. Thankfully none were too small!


Then we assembled the pieces.


The house started to take shape. And I got all giddy with excitement. She is going to love it!


Next I primed and painted the exterior, roof and ceilings.


Part two: "wallpaper" and flooring!

Thursday, December 9, 2010

'tis the season to be jolly!

Christmas has finally arrived at the Woodward house! We pulled all the bins of decorations out of the attic on November 29th and it took me until yesterday to finish. 10 days! And I only put out about half our decorations. I am definitely moving slower these days.

View from the front door.

Looking into the dining room.

The only nativity I set up this year. I love the simplicity of having just Mary, Joseph and baby Jesus (my thrifted star is hanging from the ceiling above the nativity).

The dining room.

I am really happy with the yarn trees. They fit perfectly on the new sideboard.

The hutch got a few touches of red and the pennant banner I made last year.

The family room.

I haven't made an evergreen wreath for the mantel yet. It has been unseasonably cold here and I am too wimpy to spend the time needed outside to make the wreath. Hopefully it will warm up a bit and I can get one made.

I will be making new stockings for next Christmas. We will be a family of six (!) by then and Michael and I miss having stockings. They aren't just for kids you know!

I found a place for my (pale) yarn wreath! Michael found this cool red print (you can't see the detail with the wreath on it) in his grandmothers basement years ago. We have always meant to frame it but haven't gotten around to it. I finally did a few weeks ago and then realized it was the perfect spot to set off the wreath. The snow people were made by my grandmother many years ago.

Looking into the kitchen. More of the pennant banner I made last year is strung in the opening and on the windows. Christmas pillows adorn the couch.

I love the glow of the tree at night. A word about ornaments: I have given up on having a "pretty" tree. I let my kids put on whatever they want. Which always ends of being the ornaments they made in school and ones from my childhood but I really like it that way. Our tree won't be winning any design awards but it has character and holds lots of memories.

Only 16 days until Christmas! I have lots still to accomplish. What about you? Are you ready?


UPDATE: I don't want to pretend that I am perfect or that my house is always this pristine! I like a clean and tidy home but I do have three kids. This is what is going on at my house at this very moment (5:32pm):

And really this is pretty mild. More often than not they have all the cushions off the couch and are making a fort with them. Just don't tell my husband... he hates it when they tear apart the couch! :)
Related Posts with Thumbnails